A Step-By-Step Guide to Infrared Light Therapy Treatment

For all the talk about how great infrared light is and how many benefits it has, there isn’t a whole lot of information out there on how exactly you’re supposed to do infrared light therapy treatments.

Don’t worry, I can help. What follows is a basic, step-by-step explanation of how to do infrared light therapy treatments with a single lamp + bulb. This is not quite the same as using multiple bulbs to make a DIY near infrared sauna- with only one lamp, some find they do not sweat at all. Still, even the light and heat alone can have a big impact and is well worth doing. (Stay tuned- later I will be posting about how to make a DIY near infrared sauna and do near infrared sauna treatments at home.)

Step 1: Gather Your Infrared Light Therapy Supplies

Here are the basics- what you will need to do an infrared light therapy treatment. Each person is different, so you may find that other items are must-haves for you (such as an anti-slip floor mat if you are concerned about slipping on a hard floor or an extension cord if your lamp’s cord isn’t long enough to reach the socket).

Basically, you will need:

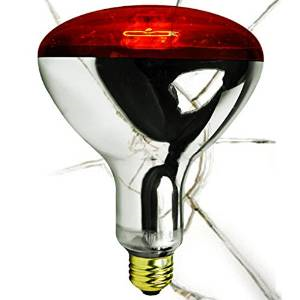
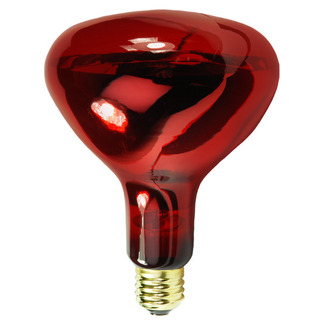
  • A near infrared light therapy bulb                                                  rubylux-near-infrared-bulb-photo
  • A clamp lamp (make sure it is a high enough Wattage rating with a heat-resistant socket) with a bulb guard
  • A square piece of wire mesh, about 12 x 12 inches (with holes that are about ¼ to ½ an inch big)
  • Eye protection for infrared heat and light
  • A timer
  • Something heavy and/or secure to attach the clamp lamp to, such as a secure shelf or chair
  • A towel to wipe away sweat

Before you start, I highly, highly recommend taking photos of the area you are treating if you are wanting to see any visible change. Without pictures, many people are unsure of whether any big changes are happening because they see themselves in the mirror every day. Instead, they often realize how much they’ve changed after several other people have noticed and commented on it. Don’t miss out! Take your “before” photos in bright light! One of the most common comments I hear from people doing infrared light therapy is, “I wish I had taken pictures!”

Step 2: Set Up Your Near Infrared Light Therapy Lamp

Once you’ve gathered your supplies, you need to set up your lamp.

  1. Check that your clamp lamp is rated for 250 Watts (if using a 250W bulb) or higher.
  2. Check that your lamp’s socket is made of porcelain or another heat-resistant material.
  3. Check that your infrared bulb is NOT Teflon-coated, also known as “shatterproof”- these bulbs release invisible, odorless toxic fumes.
  4. With the lamp unplugged, screw your infrared bulb into the lamp socket securely, just as you would any other bulb. Set the lamp down.
  5. Take the metal bulb guard that came with your clamp lamp and place your piece of wire mesh behind it. You can affix the mesh to the guard by poking the ends of the wire guard through some holes near the edges of the mesh.
  6. Attach the wire guard to the reflector bowl of your lamp. If any sharp edges are sticking out from the wire mesh, tuck them under so they cannot scratch anything or get stuck on anything.
  7. Clamp your lamp to a secure, stable object and adjust it to point to where you plan to be sitting or standing. If your lamp’s adjustment uses a wingnut, this should be easy to do. However, if it uses a bolt instead, you may need to grab a wrench to loosen the bolt, adjust the lamp and then re-tighten the bolt so the lamp doesn’t move.
  8. Do not place the lamp so you will be underneath it. If it shatters or falls, you could be injured. Instead, place it where no one (and preferably, nothing) will be underneath it if it falls. This is very important because many metal clamp lamps have clamps that are not very secure or strong. Another step you can take is to use metal wire or brackets to secure the lamp to a stationary object.
  9. Make sure your lamp’s plug can reach whatever socket you’re going to use. If not, you’ll need an extension cord. Most clamp lamps do not have an on/off switch on the cord, and you must unplug them to turn them off. Therefore, try to use an electrical outlet where you won’t have to reach over or past the infrared bulb in order to unplug it. Doing so will minimize any risk of accidentally touching the bulb.

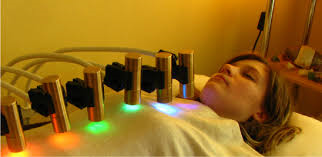
Step 3: Do Your Infrared Light Therapy Treatment

Now you’re ready to rock and roll.

  1. Get naked (if applicable).
  2. Get your eye protection, put it on and make sure it fits well.
  3. Set a timer for your desired treatment time. This is important because many people get so relaxed they feel like falling asleep during infrared light therapy treatments.
  4. Plug in/turn on your lamp.
  5. If necessary, make minor adjustments to the lamp’s direction so it points exactly where you want.
  6. You may need to move your body around somewhat to keep the light from concentrating on one single part for too long and making you uncomfortable.
  7. Use the light for 5 to 20 minutes.
  8. Use a towel to wipe away any sweat you want to remove. Do not use something that is not absorbent (such as your hand), because if even a tiny droplet of sweat gets flung into the infrared bulb while it’s hot, it may shatter.
  9. If you’ve sweated profusely, you may wish to immediately shower after your treatment to wash off excess oil and dirt. This is especially true if you are concerned about acne or infection.


What Should I Expect During and Right After My Infrared Light Therapy Treatment?

  1. You will feel warm or hot and you may sweat, even if you are only using one bulb.
  2. Your skin may appear red afterward due to the heat and increased blood flow. The redness will go away in less than an hour.
  3. You will probably need to gently adjust your position throughout the treatment so the light doesn’t focus on any one area for too long. Otherwise, leaving the light on any one point for too long may make you feel uncomfortably warm or hot.
  4. You may feel extremely relaxed- so much so that you might even feel like dozing off. This is why I suggest sitting up during your treatment and setting a timer.
  5. If previously depressed or anxious, you may notice that you feel less depressed or anxious afterwards.
  6. Stiff muscles and joints will warm up and it may become easier to move or stretch them.
  7. After a treatment, you will likely notice that any pain you had is lessened. This is usually a temporary effect, but repeated treatments over time can help heal the injury causing the pain, so long-term pain relief can also be achieved. This seems to depend on the individual, though.
  8. If you had lactic acid buildup from strenuous exercise, discomfort from it may dissipate more quickly than usual. Your muscles will recover more quickly as well.


What Should I Expect After Several Near Infrared Light Therapy Treatments?

  1. You may find that you have less pain overall and that old injuries are healing.
  2. You will likely notice that you have increased hair growth in treatment areas. The hair is likely to grow faster and thicker. This includes “undesirable” hair, such as unwanted facial hair or ear hair.
  3. Skin will usually look healthier overall, and people often notice other positive changes, such as less sagging, more plumpness/collagen formation, under-eye circles that are less noticeable and a reduction in acne.
  4. Collagen formation will improve. If the tissue in question is deeper than the skin, such as a ligament, it will probably take some time to see improvements.


How Often Can I Do Infrared Light Therapy Treatments?

You can do more than one treatment per day, but you have to allow at least a few hours in between them. Doing treatments back-to-back won’t speed up your results and it might even undo the benefits you received from infrared light therapy treatments that day. You have to allow your body time to repair itself and then it will be ready for more near infrared light therapy.

Lots of people want to know exactly how many treatments they can do in a single day. This can vary from person to person, so everyone should start slowly and gradually increase the amount of time and the number of sessions until adding more doesn’t seem to have any additional benefit. Some are able to do as many as four treatments a day, but it isn’t necessary to do that many per day to get results. In fact, you may still get noticeable results if you only use near infrared light therapy a couple times a week.


Although near infrared light therapy using a single lamp is beneficial, many people want the added benefits of sauna therapy. For this, you would need more than one near infrared light therapy bulb. Because near infrared sauna therapy is slightly different from near infrared light therapy using a single lamp, I am going to cover that topic separately in detail. Keep an eye out for that post, and for now, enjoy your infrared light therapy treatments!


Dangers of Infrared Light Therapy Bulbs: Why Shatterproof isn’t Safer

dangers of infrared light therapyOne of the inconvenient things about near infrared bulbs used for near infrared light therapy is that they are made of glass. They are fragile and can break easily if dropped. While this is an annoying problem with any sort of bulb, in the case of bulbs being used in near infrared saunas or near infrared light therapy, there’s the additional risk that the bulb could shatter during use if it is exposed to moisture. One of the biggest dangers of infrared light therapy, though, lies in shatterproof bulbs.

To solve this problem, some manufacturers began using polytetrafluoroethylene or PTFE, more popularly known by its brand name, Teflon, to coat the bulbs and sell them as “shatterproof”. A PTFE coating does indeed strengthen the bulb, making it resist breakage (although it is not fully break-proof). What most people do not know is that shatterproof near infrared bulbs release invisible, odorless fumes that are highly toxic.

It seems to be widely agreed that at low temperatures, PTFE is safe. However, at higher temperatures, the bonds in PTFE begin to break, allowing fluorocarbon gases to escape. At temperatures as low as 392 degrees Fahrenheit (200 degrees Celsius), PTFE coated near infrared bulbs will off-gas. Most near infrared light therapy bulbs reach temperatures of 450 degrees or more.

In some cases, exposure to PTFE gases will cause what is informally known as polymer fume fever in humans. Polymer fume fever can occur as a result of temperatures above 300 degrees, which is well below a near infrared bulb’s normal operating temperature of 450 degrees plus. Symptoms may be absent, or may include flu-like symptoms, such as fever, chills and headaches, as well as chest tightness, cough, a high white blood cell count and visible changes on chest x-rays. Those affected may not link PTFE bulbs to their symptoms, as onset is four to eight hours after exposure.

At temperatures above 450 degrees, PTFE decomposition and off-gassing is high enough to cause acute lung injury in humans. According to the Environmental Working Group, the following are released from heat-induced breakdown of PTFE.

  • Tetrafluoroethylene (TFE)
  • Hexafluoropropene (HFP)
  • Octafluorocyclobutane (OFCB)
  • Perfluoroisobutane (PFIB), which is a chemical warfare agent ten times stronger than phosgene
  • Carbon tetrafluoride, or carbonyl fluoride (CF4), the fluorine analog of phosgene
  • Trifluoroacetic acid (TFA)
  • Trifluoroacetic acid fluoride
  • Perfluorobutane
  • Silicon tetrafluoride (SiF4)
  • Monofluoroacetic acid (MFA), capable of killing humans at low doses
  • Hydrofluoric acid, a corrosive gas
  • Particulate matter

In baby chicks, parrots and other birds, exposure to off-gassing PTFE bulbs results in death.

Perhaps one factor contributing to the toxicity of PTFE fumes is the use of a chemical called perfluorooctanoic acid (PFOA) sometimes used to manufacture it. PFOA does not biodegrade and persists indefinitely in the environment. It is a known toxicant and carcinogen. Studies done due to a lawsuit against DuPont concluded that PFOA exposure is probably associated with kidney cancer, testicular cancer, ulcerative colitis, thyroid disease, high cholesterol and pregnancy-induced hypertension.

Needless to say, shatterproof bulbs are not the convenient substitute for real near infrared light therapy bulbs that they first appear to be. Unsuspecting consumers are being led to purchase a product that compromises their health and safety. This in and of itself is unconscionable. But consider that many people using these bulbs are trying to recover from devastating illnesses, to improve their health or just simply to detox and the sale of shatterproof near infrared bulbs for the purpose of near infrared light therapy takes on an even more devastating implication.

Types of Light Used in Light Therapy

light therapyRed Light Therapy, Blue Light Therapy, Near-Infrared Light Therapy and Far-Infrared Light Therapy

Some of the most common types of light therapy you’ll find used are red light therapy, blue light therapy, and infrared light therapy (either near- or far-infrared). While there is some debate over which wavelength is best, it’s generally becoming clear that certain wavelengths are best for certain conditions. If you were thinking of trying light therapy, you would first want to decide what result you are trying to achieve. Then you would select the wavelength and type of light believed to be effective for that condition (based on the research available).

Red and near-infrared light wavelengths can penetrate anywhere between one to six inches deep (scientists don’t agree on how deep). While scientists do not know for certain how light therapy works, there are theories. One popular view is that the light triggers the cell to make more energy (ATP) and increases DNA and RNA activity.

Some believe that this beneficial energy effect only occurs if the cell is damaged. This idea makes sense because it is usually damaged or diseased cells that one is trying to treat. However, light therapy could also have benefits for healthy cells.

Which Type of Light to Use: LED’s, Sunlight, Infrared, Etc.

The type of light that is best depends on your condition and what effect you are trying to achieve.

Sunlight is one type of light people use for light therapy. Sunlight may be chosen to increase vitamin D levels or improve fibromyalgia symptoms, for example. While sunlight can be very bright (and therefore very powerful), not everyone has access to full, bright sunlight year-round. When a more powerful light is needed, or when sunlight is not sufficiently available, another light source can be chosen. Usually, the choice is LED’s (light emitting diodes).

LED’s are by far the most popular light source used for red light therapy and blue light therapy. There are many reasons for this, but the most important one is that LED’s are capable of producing extremely bright, powerful (and therefore effective) light. Despite being extremely bright, LED’s require little energy and do not get as hot as other types of lighting. So using LED’s can be practical and also save on energy and costs. LED’s, because they’re stronger, can get the same effects faster than other light sources.

Other types of light can be used for different types of light therapy. For some conditions, these types are actually better than LED’s. An example might be using a halogen or fluorescent bulb.

What about Halogen Lights for Light Therapy?

Halogen lights put off light with a mixture of wavelengths. This “mix” is not that different from regular sunlight- it’s in the 600 to 900 nm range. This type of light can be effective and inexpensive, but it is not ideal for most applications. That is because the light it produces is not concentrated in the specific wavelengths known to be ideal/most effective.

Halogen can still have beneficial effects, however. For instance, some users of halogen light claim it temporarily reduced pain and irritation from injury. At least one other claim I’ve seen is that exercising in front of a halogen light burned more calories.

Infrared Light Therapy

Red light therapy for pain is not a new idea- people have been using infrared light for quite some time. It was believed that the heat the lamp produced was what helped so much. Now it is known that near-infrared light plays a role in relieving pain.

How Much Can Light Therapy Help Me?

There are a lot of factors in determining how much light therapy might help you: your condition, power of light used, source of light and more.

Light therapy is a very useful tool for some purposes, but it is not a magic cure-all. It is usually best used in addition to other treatments or therapies. For instance, if you are using light therapy to relieve pain, you might also apply ice and take an over-the-counter pain reliever. Light therapy should never be used as a substitute for professional medical care.

If you are using red light therapy for acne, you’d probably get maximum benefit from using it in addition to other treatments, such as topical antioxidant or anti-acne creams.

Results vary from person to person, but to give you an idea, some people say that after using light therapy for pain, their pain is reduced by 50-75%. The pain relief is temporary and usually lasts 4-6 hours. However, it is believed that using light therapy could help the injury actually heal faster.

If you have pain or a potentially serious injury, be sure to seek medical advice first!

What Wavelengths Should I Use?

The wavelength and type of light you choose depend on the results you are trying to achieve. Generally speaking, the most effective wavelengths of light are specific ranges:

  • 610 to 625 nm
  • 660 to 690 nm
  • 750 to 770 nm
  • 815 to 860 nm

How Much Light Therapy Should I Do?

When it comes to light therapy, more is not better. Doing light therapy treatments too much can cancel out the benefits you receive and depending on the type and source of light, it could also cause harm. For instance, in the case of sunlight or UV light therapy, more is not better.

If you are using light therapy for a condition that causes pain, it’s advised that you use it only long enough to cause a reduction in pain. This helps ensure you don’t overuse it and only use it enough to get the optimal result. The pain relief experienced is usually temporary and you will have to treat the area again in a few hours if pain persists. However, light therapy treatments are likely to help reduce healing time.

What’s difficult is determining how much light therapy is “too much”. That depends on the type of light source, the strength of the light, type of light, where the injury/condition is located on the body, etc. But because too much could cancel out the benefits you can get, it’s always best to err on the side of too little.

There is some evidence that the more recent an injury, wrinkle or other problem is, the more light therapy will help. So if you have a choice, it may be best to begin using light therapy soon afterwards. But not too soon! If you’re treating an injury, it is best to let inflammation subside before doing red light therapy or other light therapies. The reason is that red light therapy and most other light therapies increase blood flow to the region. If an area is already swollen and inflamed, more blood flow is not going to feel good and it is unlikely to help. Once inflammation goes down (if applicable), light therapy is often used multiple times in a day (for example, two to four times for 10 minutes each). However, in no case should you begin light therapy for a medical condition or potentially serious injury without first seeking professional medical advice. It would also be wise to discuss your case and how light therapy might be helpful with your doctor.

How Deep Can Light Therapy Penetrate Through Skin?

There is much debate over how deep light therapy devices can penetrate through the skin. This is an important matter, because if the light cannot penetrate deep enough into the body, it cannot help with problems occurring there.

One thing that is generally accepted is that the power of a light source has a big impact on how far through the skin it can reach.

Some argue that even very strong light therapy devices can only reach 1” to 1.5” deep through the skin. That implies that light therapy cannot work for anything that is deeper than that, such as a joint that is not on the surface.

Others claim that light therapy devices can sometimes reach 3” to 6” through the body- even through the skull into the brain.